How To Draw A Hawaiian Palm Tree Scene On Graph Paper

Graph drawing enables the artist to focus on precisely one aspect of the sketch at a time. People of all artist abilities use the graph method for drawing, but this tool is especially useful to novices who want to focus on learning how to draw things by hand. Today people can use computer programs to create images that look like hand drawings, but there is something to be said about actually drawing something with your own hands. The lines on the graph can be completely concealed with a medium such as markers, or a medium such as colored pencils can be used to allow the graph to show through. For this drawing, I decided to use colored pencils because I like how I can sharpen these to a fine tip, and I wanted to give the drawing the look of gazing through a window with a grid pattern on it.

Above is a photograph of what my finished drawing looks like framed, but you can see the steps below that I used to achieve this drawing.

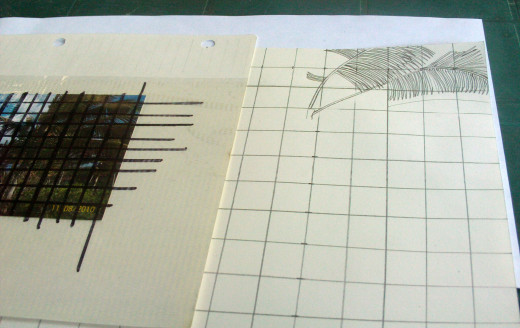
The first step for creating the graph for your sketch is to put a graph over the reference photograph. I placed the photograph in a transparent photo album page, and then used a permanent marker to draw lines over it. The photograph is 4 by 6 inches (10 by 15 centimeters) and the sketch paper is 8 by 10 inches (20 by 20 centimeters). Thus, when creating the sketch of the palm trees I am enlarging these by about 50% from the size of the photograph, which exemplifies how the graph drawing method is good for enlarging anything. You could always use a computer program or a projector to draw something perfectly to scale, but there is just something fun about sketching by hand.

First I begin sketching out the palm trees on the graph.
I sketch more details on the palm leaves as I examine the reference photograph.

I continue added the individual leaves to the palm fronds in the sketch.

After I have finished drawing the focal point tree than I begin sketch the trees that appear smaller because these are in the distance.

I also sketch in the bushes surrounding this palm tree scene.

I keep sketching and adding more detail to the scene.
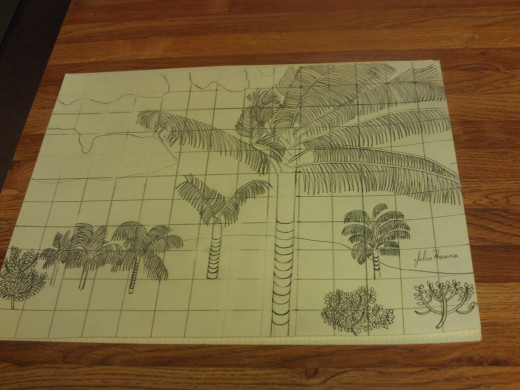
Eventually I reach a point where I am happy with the details of the sketch, and I will be ready to color it in with the colored pencils.

In this stage of the sketch I begin to color in the palm fronds of the focal point palm tree. Using colored pencil will not completely cover up the graph, but I decided it will give the impression of looking through a window that had a graph on it

I used a variation of light and dark green colored pencils with colored in the palm fronds of the focal point tree, which helps to give its leaves some dimension.

In this phase of the sketch I am coloring in more of the surrounding palm trees and bushes.

In this phase of the drawing I am beginning to color in the trunks of the palm trees with several different shades of brown colored pencils.

I am using a green colored pencil to color in the grass around the palm trees and bushes in this Hawaiian palm tree scene.

I decided to jump ahead to coloring in the sky and to come back to coloring in the grass a bit later.

In the photo above I am continuing to shade in the sky with a blue colored pencil.
In the video above I am still adding details to the palm tree drawing.

In this phase of the sketch a blue colored pencil was used to color in the blue sky portion, and white and blue oil pastels used to create the effect of the clouds.
Above is a video of the completed colored pencil drawing of the palm tree sketch.

I purchased a basic wood frame to hang and display my Hawaiian palm tree drawing on the wall.


